

Salesforce Authentication in NextJS using NextAuth
Sample project on how to integrate Salesforce with Nextjs using NextAuth.


👋 Introduction
This project was created to demonstrate how to use NextAuth.js to Authenticate Salesforce as the provider of the authentication. There is no critical data that are being stored.
There is no database involved, it only uses the access_token and refresh_token provided by the Salesforce after the authentication, and by that, we can use the Refresh Rotation Strategy.
This project also uses the jsforce library to retrieve some data from Salesforce after the authentication is completed.
Start blogging with Hashnode
Resources
Tech Stack:
- [x] Next.js
- [x] NextAuth.js
- [x] jsforce
- [x] Tailwind
- [x] Typescript
- [x] Flowbite React Components
🧑🔧 Pre-Work
Create Connected App in Salesforce
- Log in to Salesforce as an administrator.
- In the drop-down list of the account (in the upper-right corner), select Setup.
- In the left-hand pane, go to App Setup > Create >Apps.
- In the Connected Apps pane, click the New button.
- On the New Connected App page, fill in the following required fields under Basic Information:
- Connected App Name. For example, NextAuth Demo.
- API name. For example, NextAuth Demo.
- Contact Email.
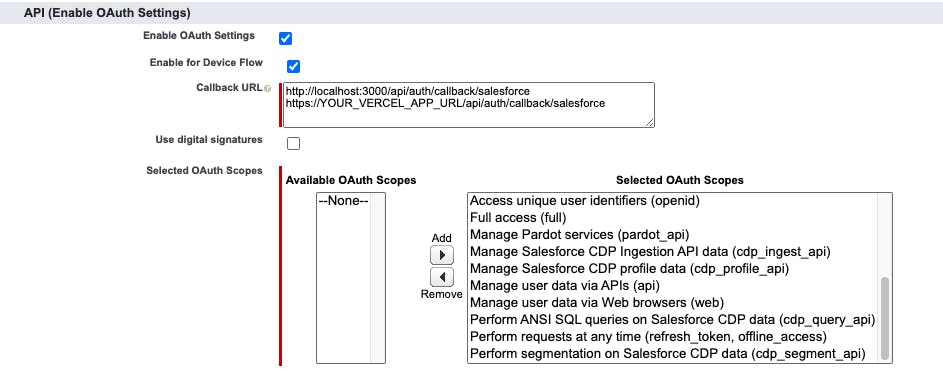
Go to API (Enable OAuth Settings), and select Enable OAuth Settings.
- In the Callback URL field, enter
http://localhost:3000/api/auth/callback/salesforceandhttps://YOUR_VERCEL_APP_URL/api/auth/callback/salesforce. - In the Selected OAuth Scopes field, for this demo, I added all available scopes. On your end, you can only select Access and manage your data (API), and then click Add.
- In the Callback URL field, enter
- Click the Save button to save the new Connected App.
- In the Connected Apps list, find the App you just created, and then click Manage.
- On the page that opens, click the Edit button.
- Under OAuth policies, select All users may self-authorize in the Permitted Users list, and then click the Save button.
- Go back to the Connected Apps list, and click the App you just created.
- Go to API (Enable OAuth Settings), and note down the Consumer Key and Consumer Secret, which will be used for the configuration of Environment Variables.
Environment Variables
For local installation, create .env.local in the root folder of the project.
SALESFORCE_CLIENT_ID=YOUR_CLIENT_KEY
SALESFORCE_CLIENT_SECRET=YOUR_SECRET_KEY
SALESFORCE_URL_LOGIN=https://login.salesforce.com

NEXTAUTH_URL=http://localhost:3000
NEXTAUTH_SECRET=YOUR_NEXTAUTH_SECRET
To generate NextAuth Secret you can use this app: generate-secret.vercel.app/32
⚡️ One-click Deployment to your own Vercel Account
Using the Vercel Deploy Button, you can quickly deploy this project into your own Vercel Account.
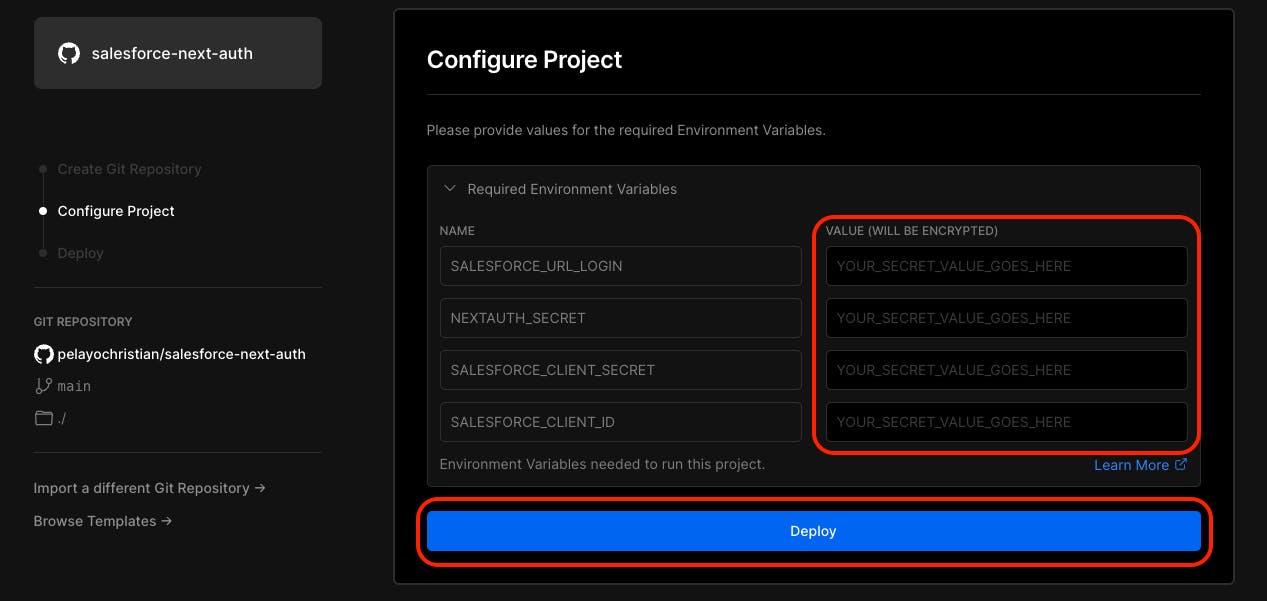
After clicking the Deploy button above, it will redirect to your Vercel Account, you'll see similar to the following screenshot below.
- Vercel will ask you to link your Github, Gitlab or Bitbucket. In this demo it uses Github, then populate the Repository Name and click Create.

- Next, it will proceed on setting up the Environment Variables needed for this project to run smoothly, then click Deploy
⚡️ Local Machine Installation
git clone https://github.com/pelayochristian/salesforce-next-auth.git
cd salesforce-next-auth
npm install
Before firing up the project make sure you already set your Environment Variables.
npm run dev
Open localhost:3000 with your browser to see the result.
⚡️ Sample NextAuth Configuration for Salesforce
[...nextauth].ts
import NextAuth, { NextAuthOptions } from "next-auth";
import SalesforceProvider from 'next-auth/providers/salesforce'
import { env } from "../../../env/server.mjs";
import axios from 'axios'
import qs from 'qs'

/**
 * Method to check the token expire date by calling the
 * Salesforce End point fot Token Introspection.
 * @param token
 */
const tokenIntrospection = async (tokenObject: any) => {
    try {
        var data = qs.stringify({
            'token': tokenObject.accessToken,
            'token_type_hint': 'access_token',
            'client_id': env.SALESFORCE_CLIENT_ID,
            'client_secret': env.SALESFORCE_CLIENT_SECRET
        });

        const tokenResponse = await axios({
            method: 'post',
            url: `${env.SALESFORCE_URL_LOGIN}/services/oauth2/introspect`,
            headers: {
                'Content-Type': 'application/x-www-form-urlencoded',
                'Accept': 'application/json'
            },
            data: data
        });

        return await tokenResponse.data;
    } catch (error) {
        return {
            error: "TokenIntrospectionError",
        }
    }
}

/**
 * Consume token object and returns a new updated `accessToken`.
 * @param tokenObject
 */
const refreshAccessToken = async (tokenObject: any) => {
    try {
        var data = qs.stringify({
            'grant_type': 'refresh_token',
            'client_id': env.SALESFORCE_CLIENT_ID,
            'client_secret': env.SALESFORCE_CLIENT_SECRET,
            'refresh_token': tokenObject.refreshToken
        });

        const tokenResponse = await axios({
            method: 'post',
            url: `${env.SALESFORCE_URL_LOGIN}/services/oauth2/token`,
            headers: {
                'Content-Type': 'application/x-www-form-urlencoded'
            },
            data: data
        });

        const { access_token, refresh_token, instance_url } = await tokenResponse.data;

        // Get expire date from token introspection end point.
        tokenObject.accessToken = access_token;
        const { exp } = await tokenIntrospection(tokenObject);

        return {
            accessToken: access_token,
            refreshToken: refresh_token ?? tokenObject.refreshToken,
            accessTokenExpires: exp,
            instanceUrl: instance_url
        };
    } catch (error) {
        return {
            error: "RefreshAccessTokenError",
        }
    }
}

export const authOptions: NextAuthOptions = {
    callbacks: {
        async jwt({ token, account }) {
            // Initial sign in
            if (account) {
                // Set access and refresh token
                token.accessToken = account.access_token;
                token.refreshToken = account.refresh_token;
                token.instanceUrl = account.instance_url;

                // Get the Expire Date
                const { exp } = await tokenIntrospection(token);
                token.accessTokenExpires = exp;

                console.log('Use New Token...');
                return Promise.resolve(token);
            }

            // @ts-ignored
            if (Date.now() < (token.accessTokenExpires * 1000)) {
                console.log('Use Previous Token...');
                return Promise.resolve(token);
            }

            console.log('Use Refresh Token...');
            return Promise.resolve(await refreshAccessToken(token));
        }
    },
    providers: [
        SalesforceProvider({
            name: 'Salesforce',
            clientId: env.SALESFORCE_CLIENT_ID,
            clientSecret: env.SALESFORCE_CLIENT_SECRET,
            idToken: true,
            wellKnown: `${env.SALESFORCE_URL_LOGIN}/.well-known/openid-configuration`,
            authorization: { params: { scope: 'openid api refresh_token' } },
            userinfo: {
                async request({ provider, tokens, client }) {
                    //@ts-ignored
                    return await client.userinfo(tokens, {
                        //@ts-ignored
                        params: provider.userinfo?.params,
                    });
                },
            },
            profile(profile) {
                return { id: profile.email, ...profile };
            }
        })
    ], pages: {
        signIn: "/signin",
    },
}

export default NextAuth(authOptions);
Conclusion
Awesome! ! ! go check the github repository of this project and I hope it helps. 😉 Thank you! Happy hacking ... 💻